Yarn Tail Techniques: Knitting, Crochet, and Beyond
A yarn tail is the loose end of yarn remaining at the start or finish of a knitting or crochet project, and securing it correctly determines whether your finished piece lasts for years or unravels after a single wash. Most crafters treat yarn tails as an afterthought, but the method you choose for weaving in yarn ends directly affects the durability, stretch, and appearance of your work. Whether you are finishing a cozy hat, a crocheted blanket, or a cosplay costume piece, the right yarn tail technique makes all the difference. This guide covers expert methods for knitting and crochet, a side-by-side comparison of both crafts, and creative ways to repurpose leftover yarn ends instead of tossing them.
What is a yarn tail and why does it matter?
A yarn tail, also called a yarn end or loose end, is the short length of yarn left over when you cast on, join a new color, or bind off a project. Leaving these ends unsecured creates real risk. An unanchored tail can work its way loose during wear or washing, pulling stitches out of alignment and causing visible gaps in your fabric. The standard industry term for the finishing process is “weaving in ends,” and it applies to both knitting and crochet.
Weaving in yarn tails rather than knotting them secures ends more reliably by locking yarn into the fabric structure itself, producing a neater finish on both sides. A knot creates a single point of stress that can pop through to the right side of the fabric, especially in finer yarns. Weaving distributes tension across multiple stitches, which is why professional knitters and crocheters universally prefer it. The tools you need are simple: a blunt tapestry needle (also called a yarn needle or wool needle), sharp scissors, and the yarn tail itself.
How to weave in yarn tails in knitting projects
Knitting yarn tail techniques rely on the orientation of your stitches. Because knit fabric is built from interlocking V-shapes, you have three weaving paths available: vertical (along a column of stitches), horizontal (along a row), and diagonal. Choosing the right path for your stitch pattern keeps the tail invisible and preserves the fabric’s natural stretch.
Here is the step-by-step process for weaving in knitting yarn ends securely:
- Thread the tail into a tapestry needle sized for your yarn weight. A needle that is too large will split neighboring stitches and create visible holes.
- Turn your work to the wrong side. Working on the wrong side keeps the tail hidden and protects the right side’s appearance.
- Weave through 3 to 4 stitches along your chosen path, passing the needle under the legs of each stitch rather than through the yarn itself.
- Execute the U-turn. Weaving through 3 to 4 stitches and reversing direction prevents the tail from loosening when the fabric is stretched. This direction change is the single most important step for long-term security.
- Weave back through 3 to 4 more stitches in the opposite direction, angling slightly to create a zigzag path.
- Trim the tail leaving about 1/8 inch. The small tag will tuck into the fabric as it relaxes.
For plied yarns like worsted or DK weight, there is a professional technique rarely covered in beginner tutorials. Splitting the tail’s plies and weaving them into separate stitch tunnels improves security and reduces bulk at the same time. Each ply grips a different set of fibers, making the tail nearly impossible to unravel as a single strand.
Common pitfalls to avoid in knitting:
- Weaving on the right side, which leaves a visible ridge
- Pulling the tail too tight, which puckers the fabric and reduces elasticity
- Weaving through open gaps in lace or openwork patterns, which makes the tail visible from the front
- Skipping the direction reversal, which allows the tail to slip out over time
Pro Tip: For socks, hats, and other items that stretch significantly, use a diagonal weaving path. Diagonal hiding disrupts stretch less than horizontal or vertical paths, keeping the fabric smooth and even under tension.
You can also weave in tails as you go, securing each end immediately after joining a new color or skein. This approach breaks the finishing work into small, manageable steps rather than facing a pile of loose ends at the project’s end.
Best practices for finishing yarn tails in crochet projects
Crochet yarn tail finishing follows a similar logic to knitting but works with a different fabric structure. Crochet stitches are denser and more three-dimensional, which gives you more material to hide a tail inside. The key is following the natural stitch path rather than cutting across it.
Follow these steps for clean, lasting crochet yarn ends:
- Leave at least 6 inches of tail when you fasten off or join yarn. Shorter tails are harder to thread and more likely to slip out.
- Thread a blunt tapestry needle with the tail. A blunt tip slides between stitches without splitting them, which protects the fabric.
- Follow the stitch path for 1.5 to 2 inches, weaving the needle under the top loops and post of each stitch. Weaving tails through 3 to 5 stitches along the stitch path and reversing direction locks the tail securely and prevents slipping.
- Reverse direction and weave back through the same area at a slight angle. This direction change creates friction that holds the tail in place even after repeated washing.
- Trim leaving a 1/8 inch tag. As the fabric relaxes and is worn, this small tag tucks itself under the surrounding stitches and disappears.
For items that get heavy use or frequent washing, three full passes with a direction change between each pass are recommended. Multiple passes with direction changes create friction locking that prevents tails from slipping out during wear. A baby blanket or market bag needs this level of security far more than a decorative wall hanging does.
Slippery yarns like acrylic, silk, or bamboo require extra attention. These fibers have less natural grip than wool, so you should weave longer (at least 2 inches), change direction twice instead of once, and consider splitting the plies for added friction. Weaving tails on the wrong side and through denser stitch areas hides yarn better and prevents visible tails on the right side, which is especially important with fine or shiny fibers.
Pro Tip: Threading a tapestry needle with a slippery yarn tail is easier when you fold the tail over the needle’s eye, pinch the fold tightly, slip the needle away, and push the pinched fold through the eye. This method works far better than trying to thread the cut end directly.
Block your finished piece after weaving in all ends, not before. Blocking relaxes the fibers and helps the small trimmed tags settle invisibly into the fabric, giving you the cleanest possible finish.
Creative uses for leftover yarn tails beyond finishing
Not every yarn tail needs to disappear into a fabric. Long leftover ends and yarn scraps can become decorative elements in their own right, reducing waste and adding personality to your projects.
Here are the most rewarding ways to repurpose yarn ends:
- Yarn tassels and fringe. Cutting and bundling twenty or more 36-inch yarn lengths creates tassels for bookmarks, bag charms, and wall art. Group multiple colors together for a gradient effect.
- Yarn beads. Roll a bundle of yarn tails tightly around a small core, then wrap additional yarn around the outside and secure with a dab of craft glue. These beads work beautifully in jewelry or as embellishments on fashion craft projects for kids.
- Faux furry tails for cosplay. Making a yarn tail for cosplay involves a felt or faux fur base with yarn strands folded and secured, with 2 to 3 extra inches allowed for folding and attachment. Even yarn distribution across the base and brushing with a stiff bristle brush improve the smooth, fluffy appearance.
- Textile wall art. Bundle yarn ends by color family and attach them to a dowel rod or driftwood piece. Trim the ends at an angle for a polished look, or leave them uneven for a more organic texture.
- Stuffing and padding. Short yarn scraps that are too small for weaving make excellent stuffing for small amigurumi figures or pincushions.
Pro Tip: When making a yarn tail for a costume, brush the finished piece with a pet slicker brush in short, downward strokes. This separates the individual plies and creates a soft, full appearance that looks far more realistic than unworked yarn strands.
Knitting vs. crochet yarn tail techniques: which should you use?
The best way to handle yarn tails depends on your craft, your yarn, and how the finished item will be used. The table below compares the key variables side by side.
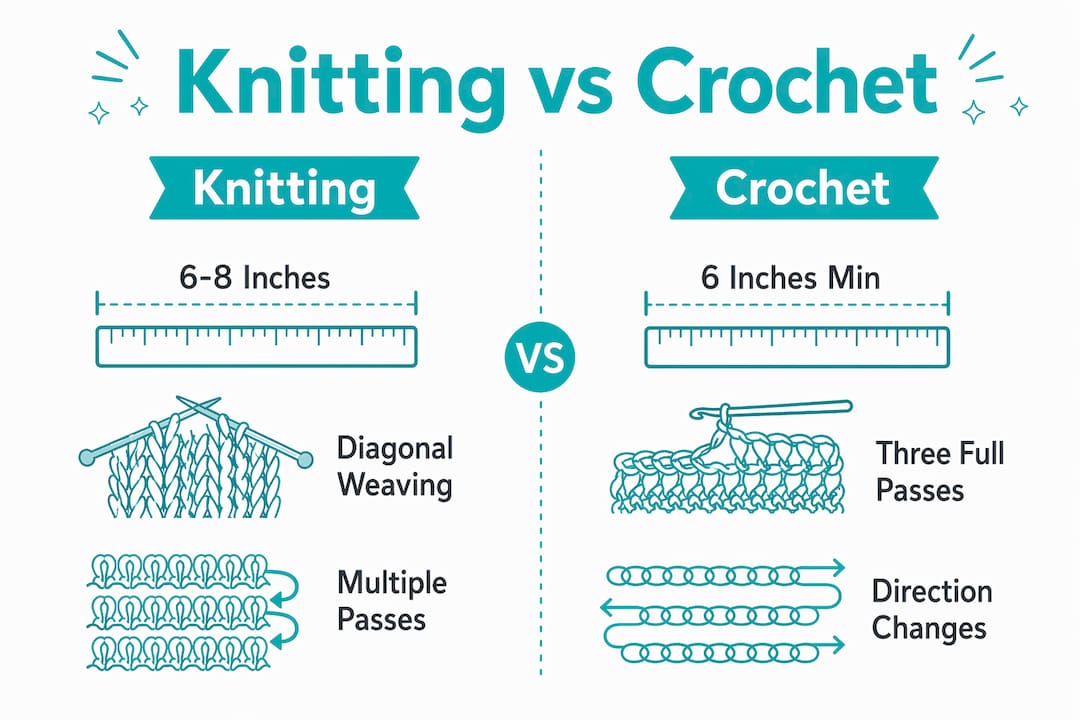
| Variable | Knitting | Crochet |
|---|---|---|
| Tail length to leave | 6 to 8 inches | 6 inches minimum |
| Weaving length | 3 to 4 stitches per pass | 1.5 to 2 inches per pass |
| Direction changes | One U-turn minimum | One to two reversals |
| Passes recommended | Two passes | Two to three passes |
| Best needle type | Tapestry needle matched to yarn weight | Blunt tapestry needle |
| Preferred path | Vertical, horizontal, or diagonal | Follow natural stitch path |
| Appearance goal | Invisible on right side | Hidden inside stitch post |
Both crafts benefit from the same core principle: multiple short weaving passes with direction reversal best balance security and avoiding bulky lumps in the fabric. The difference lies in how the fabric is constructed. Knitting has more directional flexibility because the V-shaped stitches offer three clear weaving paths. Crochet stitches are denser, so following the stitch path rather than cutting across it is the priority.
Weaving in as you go works well in both crafts and is especially useful for colorwork projects with many color joins. Securing each tail immediately keeps your work organized and reduces the mental load of a large finishing session.
Pro Tip: Never weave a tail in the same direction as the primary stress on your fabric. For a hat that stretches horizontally, weave vertically or diagonally. For a scarf that pulls lengthwise, weave horizontally. This simple rule dramatically extends the life of your finished piece.
Key takeaways
Securing every yarn tail with a proper weave-in, using direction reversal and multiple passes, is the single most reliable method for durable, professional-looking knit and crochet projects.
| Point | Details |
|---|---|
| Always reverse direction | A U-turn or direction change creates friction that prevents tails from slipping out over time. |
| Match needle to yarn weight | A correctly sized tapestry needle protects neighboring stitches and keeps the weave invisible. |
| Use three passes for heavy use items | Blankets, bags, and baby items need extra passes to survive frequent washing. |
| Split plies for maximum security | Separating yarn plies before weaving locks each strand independently, nearly eliminating unraveling risk. |
| Repurpose long tails creatively | Yarn ends longer than 6 inches can become tassels, beads, wall art, or cosplay accessories. |
Why yarn tail finishing changed how I think about crafting
I used to rush through the finishing stage, treating yarn tail management as a chore to get through before moving on to the next project. That changed the first time I watched a carefully knitted sweater develop a loose stitch after just a few washes because I had skipped the direction reversal on a single tail. The repair took longer than the original weaving would have.
What I have come to understand is that weaving in ends is not just a technical step. It is the moment when you decide how long your work will last. A project that took twenty hours of knitting deserves twenty minutes of careful finishing. The crafters whose work holds up beautifully over years are not necessarily more talented. They are simply more patient at the end.
The creative reuse angle genuinely surprised me. I started saving longer yarn ends in a small jar by color family, and within a month I had enough material for a tassel garland that now hangs in my studio. The STEAM literacy integration mindset that Teamgeniussquad champions, the idea that every material has more than one use and every process teaches something, applies perfectly here. Yarn tails are not waste. They are raw material waiting for a second purpose.
My honest advice: learn the U-turn technique first, practice it on swatches before applying it to finished projects, and never skip the direction reversal no matter how small the tail seems. That single habit will improve every project you finish from this point forward.
— Tita
Explore crafting kits and supplies from Teamgeniussquad
Yarn crafting builds the same hands-on, creative thinking that Teamgeniussquad celebrates across all of its STEAM discovery kits. Whether you are a parent looking for tactile projects that build focus and fine motor skills, or a crafter expanding your own toolkit, the right supplies make every technique easier to learn and more rewarding to practice.

Visit the Teamgeniussquad store to explore curated crafting materials, hands-on kits, and STEAM resources designed to spark curiosity and confidence. From tapestry needles and scissors to full experiment kits that turn any creative session into a discovery experience, Teamgeniussquad brings the same purposeful energy to crafting that it brings to science. Your next project deserves the best tools, and so does the young maker in your life.
FAQ
What is a yarn tail in knitting or crochet?
A yarn tail is the loose end of yarn left over after casting on, joining a new skein, or binding off a project. It must be woven into the fabric to prevent unraveling and create a clean finish.
How long should a yarn tail be before weaving in?
Leave at least 6 inches of tail for crochet and 6 to 8 inches for knitting. Shorter tails are difficult to thread onto a tapestry needle and more likely to slip out of the fabric over time.
Is weaving in better than tying a yarn tail knot?
Weaving in ends is more secure than knotting because it distributes tension across multiple stitches rather than creating a single stress point. Knots can also pop through to the right side of the fabric, especially in finer yarns.
How do you keep a yarn tail from coming loose?
The most reliable method is the direction reversal: weave through 3 to 4 stitches, turn, and weave back in the opposite direction. For items that get heavy use or frequent washing, three full passes with direction changes between each pass are recommended.
Can you reuse leftover yarn tails for other crafts?
Yes. Yarn ends longer than 6 inches can be bundled into tassels, rolled into yarn beads, used as stuffing for small amigurumi, or layered onto a felt base to create faux furry tails for cosplay costumes.


Leave a comment
This site is protected by hCaptcha and the hCaptcha Privacy Policy and Terms of Service apply.