Article: STEM Sensory Bins Help Kids Build Confidence Through Their Own Ideas
STEM Sensory Bins Help Kids Build Confidence Through Their Own Ideas
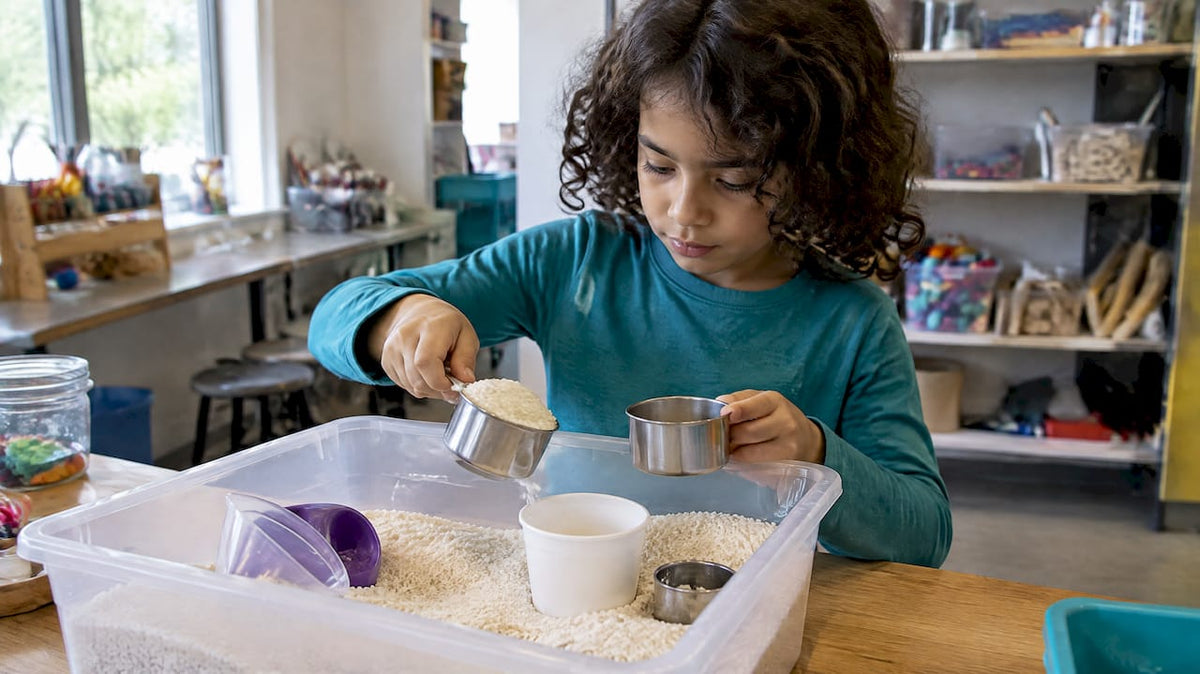
STEM sensory bins are shallow containers of tactile materials and simple tools that invite young children to observe, test and solve problems with their hands. The biggest payoff is inquiry: kids practice noticing, predicting and experimenting while building early math and engineering thinking. They suit preschool through early elementary ages with close adult supervision, and a few materials, like water beads, should stay out entirely.
TL;DR:
- Keep water beads out of homes and childcare settings with young children; the CPSC warns they can swell up to 100 times their original size.
- Stay within arm’s reach throughout play, especially with children who mouth objects, and keep small parts and strong magnets away from them.
- Pair rice, sand, beans, or water with scoops and funnels, then let children test their own questions instead of chasing one correct answer.
- Most activities last 10 to 30 minutes; stop when interest fades, dry wet materials fully before storage, and discard anything damp or moldy.
Table of Contents
- Why do sensory bins boost STEM learning?
- What safety rules and age guidance should you follow?
- What supplies do you need to build a STEM sensory bin?
- What are the best STEM sensory bin ideas?
- How do you prompt exploration without taking over?
- How should you set up, rotate and clean up bins?
- What evidence supports this approach?
- Why do we care about confidence in STEM play?
- Want guided, low-prep STEM experiences for ages 5–13?
- FAQ
- Sources
Why do sensory bins boost STEM learning?
A sensory bin works because it hands children real materials and a real question. NAEYC recommends starting with what sparks a child’s interest and aligning materials to that curiosity, which deepens engagement and problem-solving during play. A bin of rice and scoops becomes a lab the moment a child asks, “Which cup holds more?”
The multi-sensory part matters too. When a child feels, hears, sees and moves materials at once, the experience tends to stick. Researchers who study learning through several senses describe stronger connections in the brain and better memory for concepts than passive listening does. That is why a child who has poured, packed and spilled sand remembers “heavier” and “fuller” better than one who only heard the words.
The bin also maps neatly onto the STEM subjects. NAEYC’s guidance on early STEAM shows how math, science and engineering fit into play:
- Math: counting, comparing, measuring and patterns through sorting and filling tools.
- Science: material properties and cause and effect through sinking and floating or magnet exploration.
- Engineering: constructing, balancing and designing inside the bin.
The engineering link has research behind it. Field observations of children at sandboxes, water tables and puzzles show that open-ended materials reveal early engineering thinking and action. Tinkering with scoops, funnels and loose parts is practice for design thinking, not a detour from it.
One more point shapes everything below. NAEYC’s early STEAM guidance emphasizes inquiry: children reflect on what they found, such as charting what floated and what sank, instead of racing toward one correct answer. We build that stance into every idea in this article.
What safety rules and age guidance should you follow?
Safety comes first, because sensory play puts small objects within reach of small hands. The most urgent warning is about water beads. The Consumer Product Safety Commission describes them as a severe ingestion hazard: tiny when dry, hard to spot, and able to swell inside the body and cause intestinal blockages. Homes and childcare centers should keep them away from small children, and the CPSC’s own safety alert on water beads says to remove them from environments with young children.
Water beads can grow up to 100 times their original size when wet, which is why the CPSC says to remove them from spaces where young children play. Skip them entirely and choose rice, sand, beans or real water instead.
Use these ground rules for every bin:
- Stay within arm’s reach and watch the whole session, especially with children who still mouth objects.
- Keep small objects out of reach of children who may put them in their mouths, and choose materials with care.
- Keep strong magnets away from any child who might swallow them, and use large, child-safe magnets only.
- Leave heat out of sensory bins. If an activity needs warm water, the adult handles it and lets it cool first.
- Set one clear boundary at the start, such as “materials stay in the bin,” and repeat it kindly.
- Store materials in lidded containers after each session and wipe the area so no loose pieces stay on the floor.
What supplies do you need to build a STEM sensory bin?
You can assemble a good bin with items you likely own. Start with a base, add a few tools, and let the question drive the rest. NAEYC’s early STEAM guidance notes that commonly recommended bases include rice, beans or sand, paired with funnels, scoops and tweezers for fine motor practice and magnets for exploring properties.
Bases and when to use them
- Dry bases (rice, dried beans, sand, oats): best for pouring, scooping, burying and measuring. They suit fine-motor work and counting.
- Water: best for float and sink tests, pouring and displacement. Use a wide tub and a towel underneath.
- Natural materials (leaves, pebbles, shells, soil): best for sorting, earth science and pattern work.
Essential tools
- Scoops, spoons and ladles
- Funnels and measuring cups
- Tweezers and tongs
- Child-safe magnets
- A sand timer or kitchen timer
- Sorting trays or muffin tins
- Loose parts such as corks, lids, craft sticks and cardboard tubes
Loose parts deserve a special mention. NAEYC points out that many effective STEM materials are recycled or natural open-ended objects, so you do not need an expensive kit. For sourcing ideas, our post on classroom ready recycled STEM projects shows what to save from the recycling bin.
Pro Tip: Store tools in a labeled basket at child eye level, as NAEYC suggests for tinkering spaces, so kids can choose and return materials on their own.

What are the best STEM sensory bin ideas?
Each idea below uses everyday items and can be adapted to the child’s interest. Every entry names the learning goal, the materials, prompts that spark inquiry, a low-prep variation and an extension. For neurodivergent learners, we suggest posting a simple picture-step card beside the bin and keeping the routine predictable: look, try, talk, reset. For more quick options, see our 5–15 minute sensory STEM activities.
Physics: gravity and force
- Ramp and roll bin. Goal: explore how slope affects speed. Materials: a tray, cardboard ramp, balls, toy cars, marbles (age appropriate), rice base. Ask: “What happens if we make it steeper?” “Which rolls farthest?” Low prep: use a book as the ramp. Extension: measure each roll with a ribbon.
- Drop and splash bin. Goal: observe how weight and shape change a splash. Materials: tub of water, large pebbles, corks, spoons, a towel. Ask: “What do you predict?” “Why did that one splash more?” Low prep: use a pot of water. Extension: sort objects into floaters and sinkers.
- Pulley basket. Goal: feel how a pulley lifts a load. Materials: a small basket, string, a cup, a sturdy hook or rod, soft toys. Ask: “What do you notice when you pull?” Low prep: use a sturdy bar and a bucket. Extension: add heavier loads and compare effort.
Chemistry: mixing and change
- Color mixing water. Goal: see how primary colors blend. Materials: clear cups, water, food coloring, droppers, white tray. Ask: “What will red and yellow make?” Low prep: two colors only. Extension: record each recipe on a color chart.
- Ice melt rescue. Goal: observe a phase change. Materials: frozen toys in ice, warm water, salt, droppers, spoons. Ask: “What makes it melt faster?” Low prep: skip the salt and use warm water. Extension: time each method. Adult handles the warm water.
- Baking soda fizz bin. Goal: notice a chemical reaction. Materials: baking soda, vinegar, droppers, a tray, small cups. Ask: “What changed?” “What did you hear?” Low prep: pre-fill the cups. Extension: test different amounts and compare.
Earth science: layers and discovery
- Fossil dig. Goal: practice careful observation like a paleontologist. Materials: sand, toy bones or shells, brushes, small shovels, a magnifier. Ask: “What do you see?” “How old might this be?” Low prep: bury a few shells. Extension: sketch the find.
- Soil layers jar. Goal: see how materials settle. Materials: a clear jar, soil, sand, pebbles, water, a spoon. Ask: “Which layer sank first?” Low prep: use two materials. Extension: shake, wait and draw the layers.
- Rock wash station. Goal: compare textures and properties. Materials: rocks, water, brushes, towels, a sorting tray. Ask: “Which are smooth? Which sparkle?” Low prep: sort by size. Extension: make a rock key with labels.
Engineering: build and balance
- Bridge challenge. Goal: design a bridge that holds weight. Materials: craft sticks, paper, tape, two blocks, small weights. Ask: “How could we make it stronger?” Low prep: bridge a gap with a folded paper strip. Extension: count how many coins it holds.
- Boat float test. Goal: explore buoyancy and design. Materials: foil, corks, sponges, tub of water, pennies. Ask: “What shape floats best?” Low prep: use only foil. Extension: load each boat until it sinks.
- Tower in the sand. Goal: test stability on soft ground. Materials: sand, blocks, cups, craft sticks. Ask: “Why did it tip?” Low prep: use blocks only. Extension: build a base that survives a gentle shake.
Math: count, compare, measure
- Measure and fill. Goal: compare volume. Materials: rice, measuring cups, funnels, three containers. Ask: “How many scoops fill this?” Low prep: use two cups. Extension: guess first, then check.
- Number hunt. Goal: match numerals to quantities. Materials: beans, numbered cards, tweezers, small bowls. Ask: “How many beans for this card?” Low prep: numbers 1 to 5 only. Extension: add and subtract with the beans.
- Pattern builders. Goal: create and extend patterns. Materials: colored pasta or buttons, a muffin tin, pattern cards. Ask: “What comes next?” Low prep: two-color patterns. Extension: invent a pattern for a friend to continue.
Magnetism
- Magnet treasure hunt. Goal: sort magnetic from non-magnetic items. Materials: rice base, paper clips, coins, plastic pieces, a large magnet wand, a sorting tray. Ask: “Which will stick?” “What do they have in common?” Low prep: test five items. Extension: try the magnet through paper. Our guide to 12 magnet experiments for kids offers many more variations.
For teachers building a classroom rotation, our list of 15 inclusive low prep STEM bin ideas pairs well with this menu.
How do you prompt exploration without taking over?
The adult’s job is to keep the question alive, not to hand over the answer. NAEYC encourages listening to children’s questions and facilitating exploration rather than over-explaining, which supports both science learning and language development. Teachers who want a deeper framework can read this practical guide to inquiry-based learning.
Use short, open prompts:
- “What do you notice?”
- “What do you predict will happen?”
- “How could we test that?”
- “What would you change next time?”
Move through a gentle sequence: observe, compare, hypothesize, test and reflect. A child who observes that the cork floats, compares it with a pebble, guesses why, tests a second cork and then tells you what happened has completed a full cycle of inquiry without a lecture.
Recording can stay light:
- Snap a photo of the finished bin.
- Keep a tally chart of floaters and sinkers.
- Write a one-line observation journal entry, or let the child dictate it.
- Use a simple float and sink log with pictures for early writers.
Pro Tip: Wait a moment before answering a child’s question. Often they answer it themselves, and that moment builds the confidence we care about most.
How should you set up, rotate and clean up bins?
Routine is what makes bins sustainable. Pick a wide, shallow container with a lid, a towel or mat underneath, and a tray for tools. Keep a short setup checklist taped to the lid so anyone can reset the bin in minutes.
- Container: a shallow tub with a lid, plus a sheet or mat to catch spills.
- Setup: base first, tools second, challenge card last.
- Rotation: swap bins when useful at home or between classroom stations, and label each with a picture and a name.
- Cleanup: let kids sweep, scoop and sort tools back into the basket as part of the game.
- Drying and storage: dry wet materials fully before sealing them, keep dry bases in airtight containers to deter pests, and discard anything damp or moldy.
NAEYC’s tinkering guidance suggests clear organization and storage at children’s eye level, so a child can fetch and return supplies independently.
What evidence supports this approach?
Our recommendations follow NAEYC guidance on inquiry-based, play-centered STEAM and the CPSC’s safety alerts on water beads, both linked above. We also draw on practitioner research: a Penn State randomized field test found that guided STEM activity kits with scaffolding led parents to keep using them longer, feel more confident and judge that their children learned more STEM skills than with basic kits.
That finding matches our own design thinking at Team Genius Squad. Our kits are built around the E³ Method (Engage, Encourage, Empower), serve children ages 5 to 13, and include role-play items like lab coats and badges that help kids see themselves as scientists. They also pair experiments with reading, writing and reflection, an approach inspired by a real family journey with dyslexia and dysgraphia.

Why do we care about confidence in STEM play?
Here is where I land after looking at all of this: the most important thing a bin can build is not a fact. It is a child’s belief that their ideas are worth testing. When a child who struggles with reading or writing discovers that a hunch about floating can be proven with their own hands, something shifts.
That is why we lean toward neurodivergent-friendly design: predictable steps, visual supports, plenty of time and no single right answer. Celebrate effort and curiosity out loud. “You tried three boats before this one held” teaches more than “Correct.” Ask your child what they would try next, and let the answer lead.
If you make a bin from this list, share a photo or a story with us. We love seeing what young scientists discover.
— Tita
Want guided, low-prep STEM experiences for ages 5–13?
We offer ready-made experiment kits that pair experiments with role-play items and literacy connections. You get a confidence-building structure and a neurodivergent-friendly design, so you can spend your energy on the conversation instead of the gathering.

Browse the full range of kits, books and lab coats in our shop, explore our lesson plans, or pick a kit today and start your next STEM bin session.
FAQ
What are STEM sensory bins?
STEM sensory bins are containers filled with tactile materials and simple tools that let children explore science, technology, engineering and math through touch and play. They encourage children to observe, predict and test, which builds early problem-solving skills.
What age are STEM sensory bins best for?
They work well from preschool through early elementary, with adjustments for each age. Younger children need larger materials and constant supervision, while older children can handle measuring, recording and design challenges.
Are water beads safe for sensory bins?
No. The CPSC warns that water beads are a severe ingestion hazard and should be removed from homes and childcare settings with small children. Use rice, sand, beans or plain water instead.
How do I encourage problem-solving during sensory play?
Ask open questions such as “What do you notice?” and “How could we test that?” instead of giving answers. Let children try, fail and try again, then invite them to describe what happened.
How long should a STEM sensory bin activity last?
Most activities fit into 10 to 30 minutes. Stop when interest fades and save the bin for another day, since a short, focused session beats a long, restless one.
Sources
- Infant and Toddler STEAM: Supporting Interdisciplinary Experiences with Our Youngest Learners | NAEYC
- Cpsc
- [Guided STEM Activity Kits for Parents With Preschool Children: Design, Frequency of Use, and Parent Evaluation
- [Early Engineering in Young Children’s Exploratory Play with Tangible Materials | Children, Youth and Environments](https://journals.uc.edu/index.php/cye/en/article/view/6602)


Leave a comment
This site is protected by hCaptcha and the hCaptcha Privacy Policy and Terms of Service apply.