Light Box Art Projects Kids Ages 5–13 Will Love
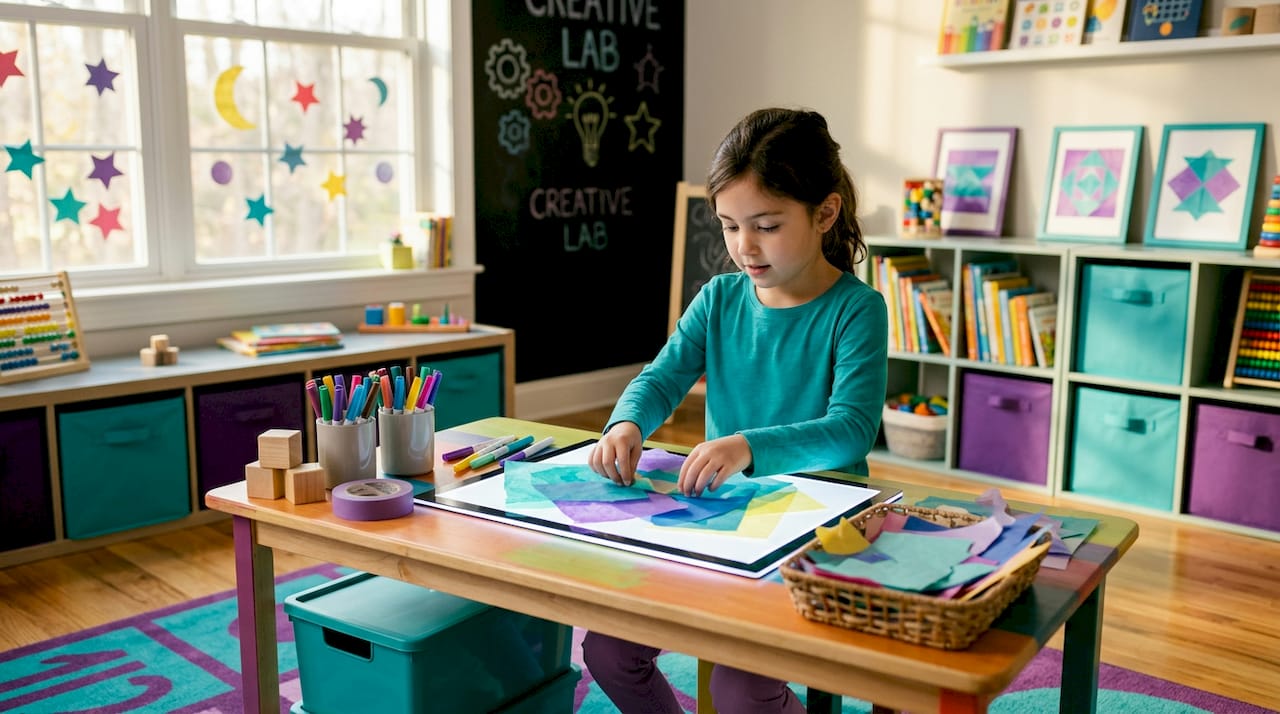
Watching a child’s face light up, literally, when their paper creation glows from beneath is one of those parenting and teaching moments you do not forget. Light box art, the practice of using a backlit surface to illuminate layered paper, film, and cutouts into glowing scenes, gives kids ages 5 to 13 a creative medium that feels genuinely magical. Also called luminous paper art or illuminated paper craft, this activity sits right at the crossroads of visual art and the science of light, making it a natural fit for any parent or educator who wants learning to feel like play.
Key Takeaways
| Point | Details |
|---|---|
| Affordable entry point | Budget LED light pads start under $40, making this accessible for most families and classrooms. |
| Safety first with light | Always choose adjustable brightness pads and diffuse light to protect young eyes and materials. |
| Layering creates magic | Stacking paper, colored film, and cutouts produces depth and color that flatly drawn art cannot match. |
| Emotional and cognitive growth | Light and shadow projects help children explore emotional expression and build observation skills. |
| Extend beyond the project | Finished pieces can become backlit wall art, classroom exhibits, or rotating home displays. |
What you need to start light box art with kids
The good news is that getting started does not require an expensive studio setup. The core supply is a light pad or light box, which is a flat, slim panel of LED lights covered with a frosted acrylic surface. In 2026, budget LED light pads are widely available for under $40, while larger or cordless rechargeable models run between $40 and $70. For classroom use, a mid-range A4 or A3 size pad with adjustable brightness is worth the slightly higher investment.
Beyond the light pad itself, you will want to gather a handful of materials your kids can experiment with freely:
- White or light-colored cardstock for base layers that allow light to pass through
- Colored translucent film or acetate sheets for layering pops of color
- Tissue paper in multiple colors for soft, glowing blends
- Safety scissors and pre-cut shape punches for younger children
- Low-tack adhesive tape to hold layers without damaging the surface
- Pencils and fine-tip markers for tracing and adding details
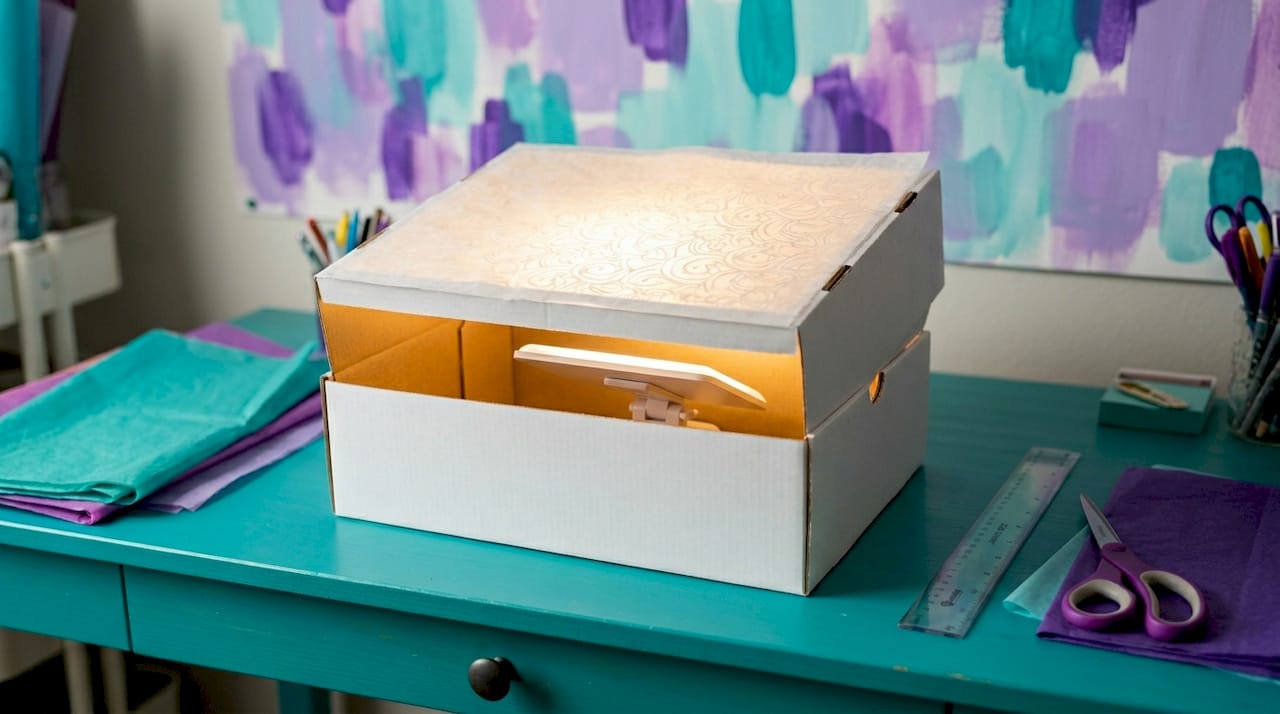
For families not ready to buy a pad, a DIY lightbox built from a cardboard box works well. Place a lamp at a 45-degree angle on each side and cover the box opening with white tissue paper to diffuse the light. One rule that matters: the box should be at least twice the size of your artwork. A box that is too small produces harsh shadows that flatten the whole effect.
Pro Tip: When shopping for a light pad for a child, prioritize adjustable brightness and rechargeable battery power over brand name. Adjustable brightness helps you dial in the right glow for thin tissue paper versus thicker cardstock without straining young eyes.
| Light Pad Option | Approximate Price | Best For | Key Feature |
|---|---|---|---|
| A4 USB light pad (basic) | Under $30 | Ages 7 and up, tracing | Slim, portable |
| A4 rechargeable pad | $35 to $50 | Ages 5 and up, classroom | Cordless, adjustable brightness |
| A3 LED light pad | $50 to $70 | Group projects, older kids | Larger work surface |
| DIY cardboard box | Under $10 | Budget-friendly, any age | Fully customizable |
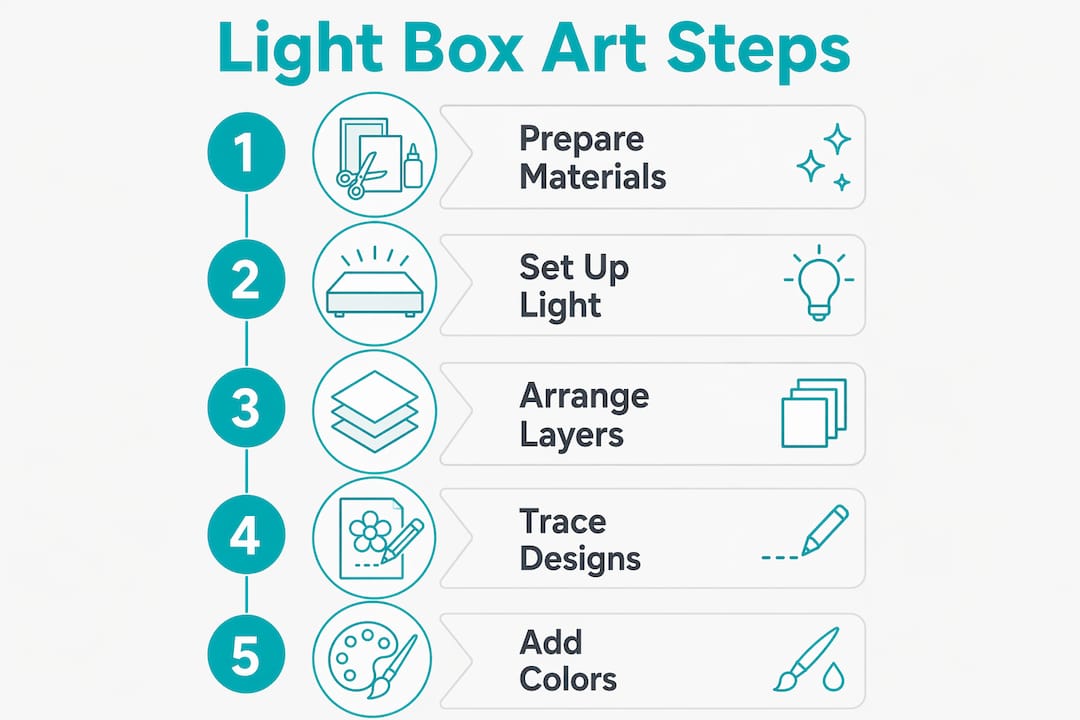
How to make light box art: a step-by-step guide
Starting simple keeps kids confident, and confidence is the whole point. Here is a beginner-friendly process that works for ages 5 through 13, with natural ways to adjust the complexity based on the child’s age and ability.
-
Set up the light source. Place your light pad on a flat, stable surface and turn it on. Start at the lowest brightness setting and adjust upward once your paper layers are in place. Never let the light shine directly onto the artwork without a diffusion layer. Direct light without diffusion creates harsh hot spots that wash out color and detail.
-
Choose your base layer. Cut a piece of white cardstock to fit the pad. This is the foundation your child will build on. For younger kids ages 5 to 7, pre-draw a simple outline like a tree, house, or animal on the cardstock so they have a guide to follow.
-
Add color with translucent film. Cut colored acetate or tissue paper into shapes that fill in sections of the design. Layering two colors of tissue paper on top of each other creates a new blended color when the light shines through, which is often the first “wow” moment for kids.
-
Build depth with cutout layers. Place a second sheet of cardstock on top with shapes cut out of it. The light will pour through those cut shapes and highlight the colored layers beneath. Even a simple silhouette of a tree with leaf-shaped holes creates a stunning glowing effect.
-
Secure the layers loosely. Use small pieces of low-tack tape at the corners to keep layers from sliding. Remind kids that adjusting layers is part of the fun, so there is no need to glue everything down permanently.
-
Step back and evaluate the glow. Dim the room lights and look at the full effect. Encourage your child to describe what they see and what they want to change. This observation step is where science thinking sneaks naturally into the art session.
-
Photograph the finished piece. Take a photo before dismantling the layers, because a flat light pad glowing beneath layered paper photographs beautifully and gives kids a record of their work.
Pro Tip: Encourage kids to experiment by sliding colored film pieces in and out while the light is on. Watching colors blend and shift in real time teaches color theory far more effectively than any worksheet.
Creative project ideas to inspire young artists
Once your child or students have the basics down, the real creative exploration begins. The variety of directions you can take illuminated art is genuinely surprising, and different project types appeal to different age groups and learning styles.
-
Glowing story scenes. Have children create a three-layer scene: a background layer with a colored sky, a middle layer with silhouetted trees or buildings, and a foreground layer with characters cut from cardstock. This naturally introduces the concept of perspective and layers in visual storytelling. Pair it with a written or verbal story for a full literacy connection.
-
Seasonal shadow boxes. Fall leaves, winter snowflakes, spring flowers, and summer suns all translate beautifully into light box compositions. Using seasonal themes also makes this activity easy to integrate into a classroom calendar and keeps the subject matter feeling fresh throughout the year.
-
Color mixing experiments. Layer red and yellow film, or blue and green. Ask the child to predict what color will appear before the light turns on. This simple experiment connects directly to color theory and basic science observation. Light used as a creative medium helps children explore emotional expression and quiet observation, skills that extend well beyond the art table.
-
Group murals for classrooms. Assign each student a section of a larger scene, then assemble the individual panels side by side on multiple light pads or one long light strip. The result is a collaborative illuminated mural that showcases every child’s contribution while building community in the classroom.
-
Character design and world-building. Older kids ages 10 to 13 can develop original characters using layered cutouts, giving each character distinct colors and shapes. This project ties into creative writing, builds narrative thinking, and can extend into a whole illustrated story presented as an illuminated art display.
These project types keep the activity from feeling repetitive, which matters enormously when you are working with children over multiple sessions.
Troubleshooting common light box art challenges
Even the most prepared parent or teacher runs into snags. Knowing what to expect means you spend less time frustrated and more time creating.
Uneven lighting and unwanted shadows are the most common issue, especially with DIY setups. As noted in professional lightbox guidance, diffusion is non-negotiable. Always place a sheet of white tissue paper or translucent plastic between the light source and the artwork. For LED pads, make sure the pad is fully illuminated before layering materials on top.
Delicate materials tearing is a real concern with young children. Tissue paper especially can rip when small hands handle it with enthusiasm. Keep a spare supply on hand and frame tearing as an opportunity to create “new shapes” rather than a mistake. For ages 5 to 7, pre-cut the materials and let children focus on placement rather than cutting.
- Keep scissors age-appropriate: safety scissors for ages 5 to 8, small craft scissors for ages 9 and up.
- Store delicate layers flat between sheets of cardstock to prevent crumpling between sessions.
- Use a thin piece of clear acrylic or a sheet protector over the light pad surface to protect it from adhesive residue.
- Rotate brightness settings to find the sweet spot for each material. Proper illumination is about balance and precision, not simply turning the brightness to maximum.
Pro Tip: If a child’s enthusiasm is outpacing their fine motor skills, try punching shapes with a craft hole punch instead of scissors. Stars, circles, and hearts punch cleanly and give younger kids the independence of cutting without the frustration.
Displaying and preserving your child’s glowing creations
Finishing a project is only half the story. Knowing how to show it off and keep it safe gives children the sense that their work genuinely matters.
Here are some practical display and storage options that work for both home and classroom settings:
- Backlit wall art with a dedicated frame. Purchase a thin LED panel or a flat light pad designed for display, then mount the layered artwork over it in a shadow box frame. The result is a piece of backlit wall art your child helped create, and it looks impressive in any room.
- Rotating gallery wall. Set up a simple gallery wall where children’s illuminated art displays rotate monthly. This gives each piece its moment and keeps the display fresh without permanent commitment.
- Photo preservation. Photograph each piece in a darkened room with the light pad glowing beneath it. Print the photos for a portfolio or classroom art book that documents the child’s creative growth over time.
- Flat storage between sessions. Stack completed layered pieces between sheets of cardboard inside a flat portfolio folder. Never roll layered light box projects because the layers will shift and wrinkle.
Incorporating a child’s finished piece into a home or classroom environment sends a powerful message: your creativity belongs in real spaces, not just in a folder.
My take on why light box art works when other projects don’t
I have seen countless creative projects launched with excitement and abandoned by the second session. What makes light box art different, in my experience, is the immediate feedback loop. A child places a piece of colored film, turns on the light, and something visually stunning happens within seconds. That moment of “I made that happen” is what keeps them at the table.
What I have learned working alongside children who struggle in traditional learning environments is that the medium matters enormously. Kids who find pencil-and-paper drawing frustrating often flourish with light-based projects because the art is built through layering and placement rather than precise drawing technique. The outcome looks sophisticated even when the process was simple, and that matters deeply for a child’s confidence.
I also think adults underestimate how much light projects teach without ever announcing that they are teaching. Color mixing, spatial reasoning, the relationship between opacity and transparency — these concepts embed themselves quietly while children are simply playing. Light as a medium invites children to slow down and observe, which is itself a skill worth developing.
My one consistent piece of advice: resist the urge to fix it. When a child’s shadow falls somewhere unexpected or two colors create a muddy blend, let them sit with the result first. Often, they will discover something interesting about it before they decide to change it. That pause is where genuine creative thinking lives.
— Tita
Build on the spark with hands-on STEAM kits
Light box art opens a door, and Teamgeniussquad helps kids walk through it. The same curiosity that drives a child to experiment with glowing layers of color is exactly what powers real scientific discovery. Teamgeniussquad’s hands-on, screen-free STEAM kits, built on the E³ Method of Engage, Encourage, and Empower, pair perfectly with creative light projects. The DIY Lamp STEM Experiment Kit lets kids build and illuminate their own light source, connecting the art they create to the science behind it. For families who want to go further, the STEM-STEAM Electricity Lab Bundle offers a full hands-on exploration of light and electricity that extends the wonder of light box art into real scientific experimentation.
FAQ
What is light box art for kids?
Light box art is the practice of layering translucent materials like tissue paper, colored film, and cardstock cutouts over a backlit surface to create glowing, illuminated scenes. It is accessible for children ages 5 and up and requires no drawing skill to produce stunning results.
How much does a light pad cost for kids’ projects?
Entry-level LED light pads suitable for children’s projects are available for under $40 in 2026, with rechargeable and larger models ranging from $40 to $70. A DIY cardboard box version costs under $10.
What materials work best for light box art with children?
White cardstock, colored tissue paper, translucent acetate sheets, and safety scissors are the core materials. Tissue paper layers create soft color blending, while cardstock cutouts produce crisp glowing shapes.
Is light box art safe for young children?
Yes, when you use a LED light pad with adjustable brightness and keep the light diffused rather than direct. Always supervise young children with scissors and avoid pointing any bare bulb directly at a child’s eyes.
Can light box art be used in a classroom setting?
Absolutely. Group projects like collaborative illuminated murals, seasonal scene-building, and color-mixing experiments all adapt well to classroom use and connect naturally to art, science, and literacy standards.


Leave a comment
This site is protected by hCaptcha and the hCaptcha Privacy Policy and Terms of Service apply.