

Five Minute Reset to Make a Maker Space at Home That Kids Will Use
A useful maker space at home is nothing more than one dedicated surface, a bin for the active project, and a handful of consumables kept ready to go. Start with a desk or a rolling cart, stock it with tape, cardboard, glue, and a few basic tools, and build a five-minute reset habit around it. A ready-made kit built on the Engage, Encourage, Empower method offers a proven starting project while you figure out the rest.
TL;DR:
- A home maker space can be simple and cost-effective, often relying on a dedicated surface, basic tools, and consumables like tape and glue.
- Placement should be based on the types of projects, with options ranging from a corner of the kitchen table to a garage bay, considering room for safety and workflow.
- Organizing with labeled bins, a project tray, and quick routines helps the space stay functional and encourages ongoing use as children grow.
- Safety rules emphasize adult operation of power tools and proper emergency preparedness, with consistent start-up and reset rituals to instill habits.
- Start with structured, goal-oriented projects like making game pieces or building a bridge to foster learning, iteration, and project ownership.
Table of Contents
- Where Should You Put a Home Maker Space?
- What Belongs on Your Home Maker Space Materials List?
- How Do You Organize a Maker Space So It Grows With Your Kids?
- What Safety Rules Actually Matter in a Home Maker Space?
- What Are Good First Projects for a Home Maker Space?
- How Guided Kits Fit Into a Home Maker Space
- What Should You Budget for a Home Maker Space?
- Where to Find More Maker Space Materials Lists
- Why Most Home Maker Space Advice Gets the Priorities Backwards
- Sources
- FAQ
Where Should You Put a Home Maker Space?
The right spot depends on what your kids will actually build, not on how much square footage you have. A corner of the kitchen table works fine for cardboard sculptures and paper circuits. A garage bay is worth the effort only if woodworking or power tools are part of the plan. Complexity should drive the footprint, not the other way around.
A compact model that scales from a desk to a full garage uses four zones:
- Idea zone: a small table or clipboard area for sketching and planning before anything gets cut or glued.
- Digital zone: a laptop or tablet spot for tutorials, design software, or documenting progress with photos.
- Machine zone: wherever cutting, drilling, or heat tools live, ideally against a wall with a hard, wipeable surface.
- Test and reset zone: an open patch of floor or table where kids try out what they built and where everything gets put away.
On a desk, these four zones can overlap into labeled sections of a single tray. In a garage, phased workshop planning suggests keeping at least 30 to 36 inches of walkway clearance, positioning outlets near the machine zone rather than running extension cords across floor traffic, and checking that any space with a glue gun or rotary tool has decent airflow.
What Belongs on Your Home Maker Space Materials List?
Most of what a home maker space needs costs less than a trip to the movies. Comprehensive educator lists commonly run past 50 base materials, including clay, magnets, dowel rods, cardstock, cardboard tubes, masking tape, painter’s tape, and duct tape in a few colors. That range sounds like a lot until you realize most of it is stuff you’d otherwise throw away or buy for a school project anyway.
A starter shopping and gathering list, roughly in order of how often you’ll reach for it:
- Glue sticks and one low-temp glue gun (kids can handle low-temp with supervision; standard glue guns run too hot for younger hands)
- Cardboard in multiple sizes, from cereal boxes to appliance boxes
- Masking tape, duct tape, and painter’s tape
- Cardstock, construction paper, and a ruler or measuring tape
- Child-safe scissors and one pair of adult-only utility scissors or a craft knife kept out of reach
- Dowels, clothespins, rubber bands, and magnets for mechanism-building
- Modeling clay or air-dry clay for prototyping shapes
Pro Tip: Before buying anything new, ask your local library, school PTA, or a neighborhood tool library if they lend craft supplies or specialty tools like button makers and die cutters. Library-curated materials lists are a solid template for what’s actually worth owning versus borrowing.
Anything that involves a blade, a heat source above low-temp, or a motor with exposed gears stays adult-operated. That’s not a suggestion. It’s the line between a great afternoon and a trip to urgent care.
How Do You Organize a Maker Space So It Grows With Your Kids?
Fixed cabinetry looks tidy on day one and becomes a bottleneck by month three, once your child moves from paper crafts to simple electronics or basic woodworking. A French cleat wall system solves this because tool holders slide off and rearrange in seconds, no drilling required. Pair it with a mobile cart or workbench on locking casters, and the whole setup rolls out of a garage bay or closet when the space needs to double as something else.
Four rules keep the system from collapsing into chaos:
- One active project at a time gets a labeled bin. Everything else stays boxed until it’s actually in progress.
- Every bin gets a name and a photo label, not just a word, since younger kids read pictures faster than text.
- A visible startup card sits on the desk or cart, listing that session’s one-sentence goal and a quick safety check before hands touch tools.
- A project tray catches loose parts during the session so cleanup is one sweep instead of a scavenger hunt.
Lighting matters more than most parents expect. A single overhead bulb casts shadows exactly where fine motor work happens. Add a clamp lamp at the workbench and keep power strips mounted off the floor near the machine zone, not looped across a walkway.
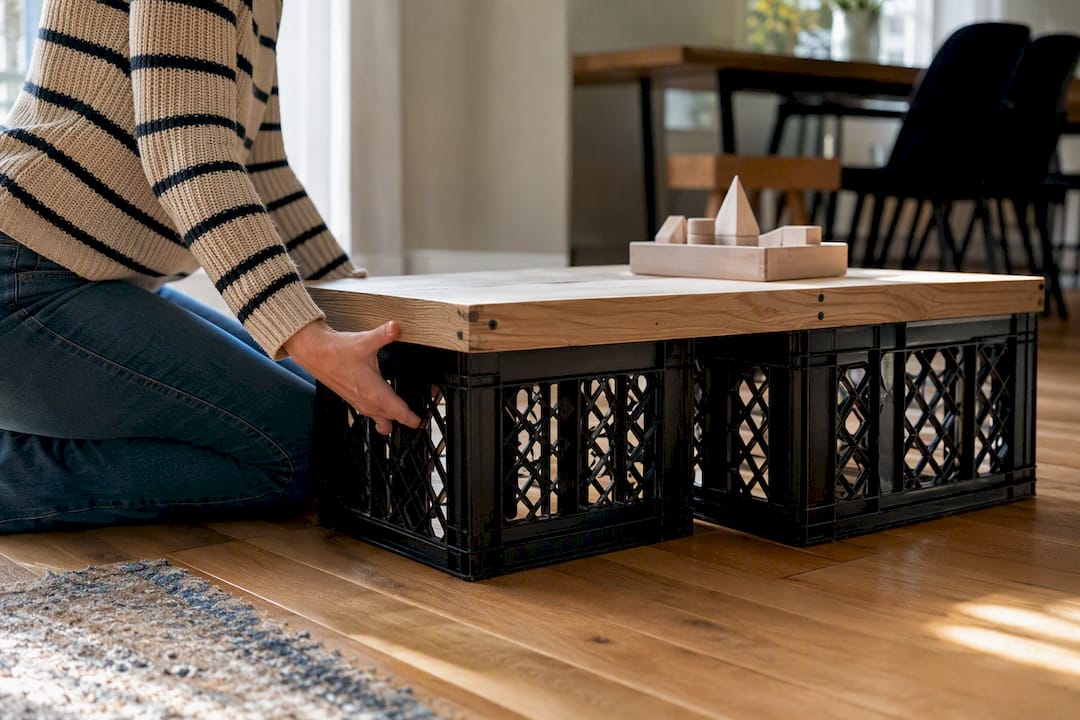
Pro Tip: Set your workbench height to your child’s wrist level for detail work, not their shoulder height. A stack of two milk crates makes a cheap, adjustable riser as they grow.
What Safety Rules Actually Matter in a Home Maker Space?
Safety in a home maker space comes down to three things: knowing which tools require an adult’s hands, keeping basic emergency gear within reach, and running the same startup ritual every single time so rules become muscle memory instead of a lecture.
- Hot glue guns above low-temp, rotary tools, drills, and anything with an exposed blade are adult-operated only, full stop, regardless of how confident your ten-year-old sounds.
- Keep a stocked first-aid kit and a Class C fire extinguisher (rated for electrical fires) within arm’s reach of the machine zone, not in a closet down the hall.
- Safety glasses go on before any cutting, sanding, or hot-glue work begins, no exceptions for “just one quick thing.”
- Keep the walkway to the door clear at all times. A tripping hazard next to a hot glue gun is how a minor mistake becomes an emergency room visit.
- Teach a stop signal, a raised hand or a specific word, that means “put the tool down now,” and practice it once before the first real project.
Wrap every session with the same five to ten minute reset: tools back on the cleat wall, bin closed, surface wiped. Short, repeatable rituals are what actually keep a home maker space usable past the first two weeks, far more than any amount of gear.
What Are Good First Projects for a Home Maker Space?
The projects that stick are the ones with a clear finish line and a real reason to exist, not open-ended “make something cool” prompts that leave kids staring at a pile of cardboard.
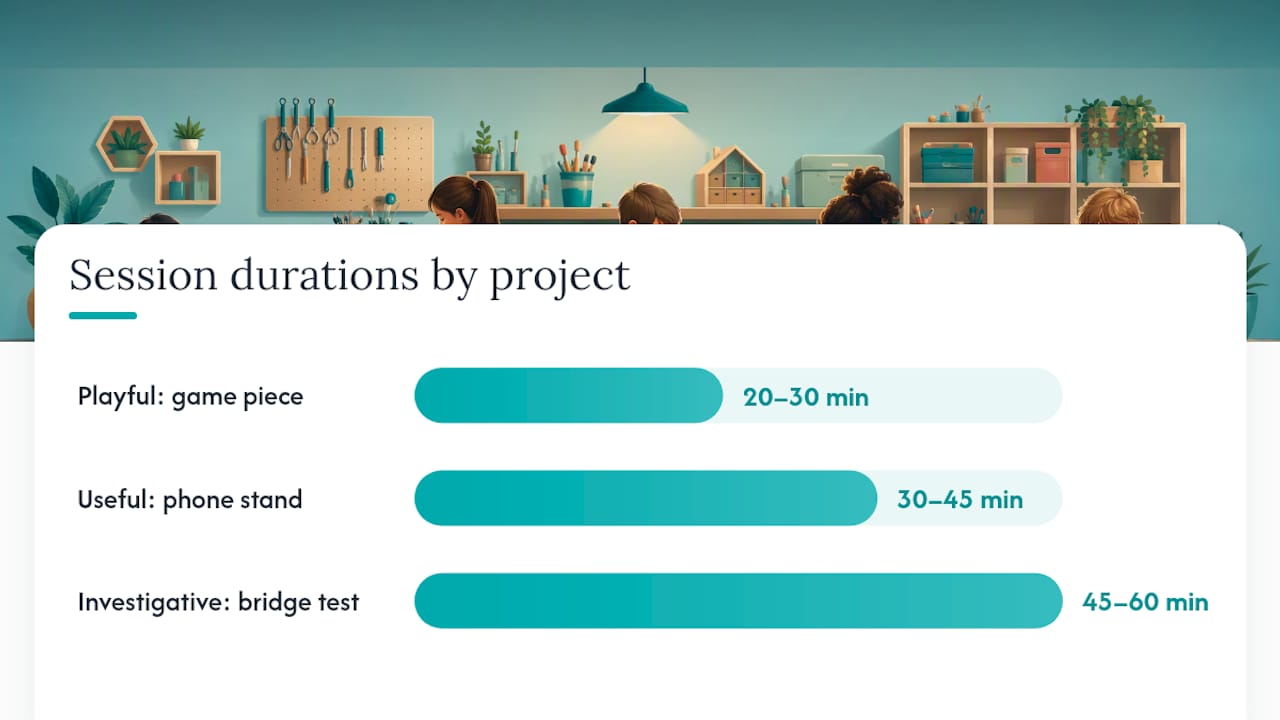
- Playful: a custom game piece. Materials: clay or cardboard, paint, 20 to 30 minutes. Kids sculpt or cut a piece for an existing board game, then test it in actual play. Learning outcome: iteration, since the first version rarely fits the board.
- Useful: a phone or tablet stand. Materials: cardboard, dowels, tape, 30 to 45 minutes. The stand has to hold a real phone at a real angle. Learning outcome: structural thinking, because a stand that looks fine standing still often collapses under actual weight.
- Investigative: a bridge load test. Materials: craft sticks, glue, string, small weights, 45 to 60 minutes. Kids build a mini bridge, then add weight until it fails, and record how much it held. Learning outcome: engineering under constraint, plus the useful lesson that failure is data, not defeat.
Run every session the same way: a ten-minute opening where the child states the one-sentence goal out loud, the making time itself, and a five to ten minute reset with a quick note on what worked. That note becomes next week’s starting point instead of a blank slate.
Pro Tip: Once a month, ask your kids a two-question survey: what they wish they’d had last session, and what they want to build next. Surveying kids before restocking prevents buying supplies nobody touches, and for a structured take on scaffolded builds, step-by-step robotics project templates offer a useful model for breaking bigger builds into stages.
How Guided Kits Fit Into a Home Maker Space
A shelf of loose materials is a great foundation, but some days a family needs a project that’s already been thought through end to end. That’s where a guided kit earns its place inside the digital or idea zone rather than replacing it.
Some kits are designed around an Engage, Encourage, Empower method, moving a child from initial interest through guided skill-building steps to empowerment upon completion. That arc mirrors the project flow already at work in a home maker space: open with a goal, build, test, reflect.
- Role-play elements such as lab coats and completion certificates can turn a finished project into an identity moment, not just a checked box.
- Literacy integration, including reading instructions, writing predictions, and reflecting on results, ties STEAM skill-building to reading and writing practice simultaneously.
- Some kits are shaped by experiences with dyslexia and dysgraphia, reflected in how instructions are sequenced to support kids who need more visual scaffolding.
What Should You Budget for a Home Maker Space?
A starter budget covers a folding table or repurposed desk, a plastic bin, basic consumables like tape and cardboard, and one pair of child-safe scissors, most of it sourced free from around the house.
- Starter tier: desk or table, one active-project bin, tape, glue, cardstock, scissors. Nearly everything here is repurposed or already in a junk drawer.
- Mid tier: adds a rolling cart, a low-temp glue gun, a basic tool set, and a small clamp lamp for the workbench.
- Upgrade tier: adds a French cleat wall, a sturdy workbench at the right height, and enclosed storage for anything with a blade or motor.
Buy the specialty item, a die cutter, a rotary tool, a specific clamp, only after a project has required it two or three times. That “just in time” rule stops a maker space from turning into a closet of unused gadgets. Spend real money on the bench and any tool enclosure; save on everything else through low-cost, low-tech starter materials and community donations.
Where to Find More Maker Space Materials Lists
For a deeper materials reference, the MIT K-12 Makerspace shop charts break tools down by category with supplier notes, useful once your family outgrows the starter list. The North Penn Now guide covers small-footprint setups in more detail, and Team Genius Squad’s shop collection is worth a look for a turnkey first project.
Why Most Home Maker Space Advice Gets the Priorities Backwards
Most guides to setting up a maker space at home lead with the shopping list, and that’s exactly backwards. The research on this is consistent: family guidance keeps circling back to routine and footprint, not inventory, as the thing that determines whether a space gets used past week two. A garage stocked with $500 of tools and no reset habit goes cold by spring. A card table with a labeled bin and a five-minute cleanup ritual stays alive for years.
The other overlooked piece is asking kids what they actually want to build before buying anything. Parents default to guessing, usually buying toward their own interests, and end up with unopened kits. A two-minute survey after each session fixes that.
If you want the structure without months of trial and error, a guided kit like the ones built on Team Genius Squad’s E³ Method gives you a tested first project and a confidence-building arc already worked out. Use it as your opening ritual, then let your own materials list take over from there. Start small, reset every time, and let the kids steer more of it than feels comfortable at first.
— Tita
Sources
FAQ
Why Do Home Maker Spaces Often Fail?
Most fail from too much inventory and no repeatable routine, not from lacking the right tools. A five-minute reset habit and a small, labeled project bin do more for long-term use than any amount of gear.
Is a Home Maker Space Worth the Cost?
For most families, the value shows up in engagement and skill-building rather than dollars saved. A starter setup runs on repurposed materials and basic consumables, so the real investment is time spent on routine, not on expensive equipment.
What Should Be in a Kids’ Maker Space?
A useful setup includes one work surface, a labeled active-project bin, and core consumables like tape, cardboard, glue, and cardstock, plus a broader materials list for clay, magnets, and dowels as projects expand. Add child-safe scissors and a low-temp glue gun once kids are ready for basic assembly.
What Exactly Is a Maker Space?
A maker space is a dedicated area, ranging from a desk to a garage, set up for hands-on building, testing, and iterating on projects. It relies on a small set of tools and materials, clear zones for planning versus building, and a routine that keeps it usable session after session.
What Age Is Appropriate for Tools Like Glue Guns or Rotary Tools?
Low-temp glue guns work for most kids with direct supervision, while rotary tools, drills, and blades stay adult-operated regardless of age. The right threshold depends more on the individual child’s follow-through with safety rules than on a fixed birthday.


Leave a comment
This site is protected by hCaptcha and the hCaptcha Privacy Policy and Terms of Service apply.