Duct Tape Bracelets Kids Will Love Making
Duct tape bracelets are one of those rare crafts that check every box: they are waterproof, colorful, beginner-friendly, and genuinely fun to wear. Whether you are a parent looking for a rainy-day activity or a craft enthusiast hunting for easy duct tape projects that deliver real results, this guide walks you through everything you need. You will find step-by-step instructions for both cuff-style and braided bracelets, plus creative customization tips, troubleshooting advice, and ideas for turning bracelet making into a group activity that builds real skills in kids.
Table of Contents
- Key Takeaways
- Duct tape bracelets: what you need to get started
- How to make a simple cuff-style bracelet
- Making a braided duct tape bracelet
- Creative customization and common troubleshooting
- Group projects and benefits for kids
- My take on duct tape bracelets as a family craft
- Take the creativity even further with Teamgeniussquad
- FAQ
Key Takeaways
| Point | Details |
|---|---|
| Simple cuff requires one strip | A single 10-inch folded strip creates a clean, wearable cuff bracelet for beginners. |
| Braided style uses three colors | Cut three 17-inch strips in different colors and braid them for a vibrant, durable result. |
| No knotting needed | Duct tape bracelets are simpler than friendship bracelets and perfect for younger crafters. |
| Workspace setup matters | A cutting mat or cardboard surface prevents premature sticking and keeps cuts clean and straight. |
| Repetition improves quality | Making and unmaking braided bracelets several times softens the tape for a neater, more polished finish. |
Duct tape bracelets: what you need to get started
Before you cut a single strip of tape, having the right supplies on hand makes the whole process smoother and more enjoyable. The good news is that duct tape bracelets require very little investment. Most of what you need is probably already sitting in a drawer somewhere.
Here is a quick overview of the core materials and their purpose:
| Material | Purpose |
|---|---|
| Duct tape (multiple colors or patterns) | Main crafting material for the bracelet body |
| Scissors or craft knife | Cutting strips to length and trimming edges |
| Ruler | Measuring accurate strip lengths |
| Cutting mat or cardboard | Protecting surfaces and preventing tape from sticking prematurely |
| Binder clip or clipboard | Anchoring tape strips during braiding |
| Velcro dots or small snap closures | Creating adjustable or removable closures |
When it comes to choosing tape, the best duct tape for bracelets is any brand that comes in bold, consistent colors or fun patterns. Neon shades, metallics, and printed designs all work beautifully for colorful duct tape crafts. Duck Brand and Scotch are widely available and hold up well through repeated wear.
Strip width and length vary depending on the style you want to make. For a simple cuff bracelet, you will work with one longer strip folded lengthwise. For a braided bracelet, you will need three separate strips, each cut to about 17 inches. Using a cutting mat or a piece of cardboard as your workspace prevents the tape from sticking to your table and keeps your cuts precise.
Pro Tip: Lay your tape strips sticky-side up on a piece of cardboard before folding. This gives you a stable surface to work from and prevents the tape from curling on itself before you are ready.
Safety is worth mentioning here. Craft knives give the cleanest cuts, but scissors work perfectly well for kids. If children are helping with the cutting, opt for scissors with rounded tips and supervise closely. The folding and braiding steps are completely safe for kids to handle on their own once the strips are prepared.
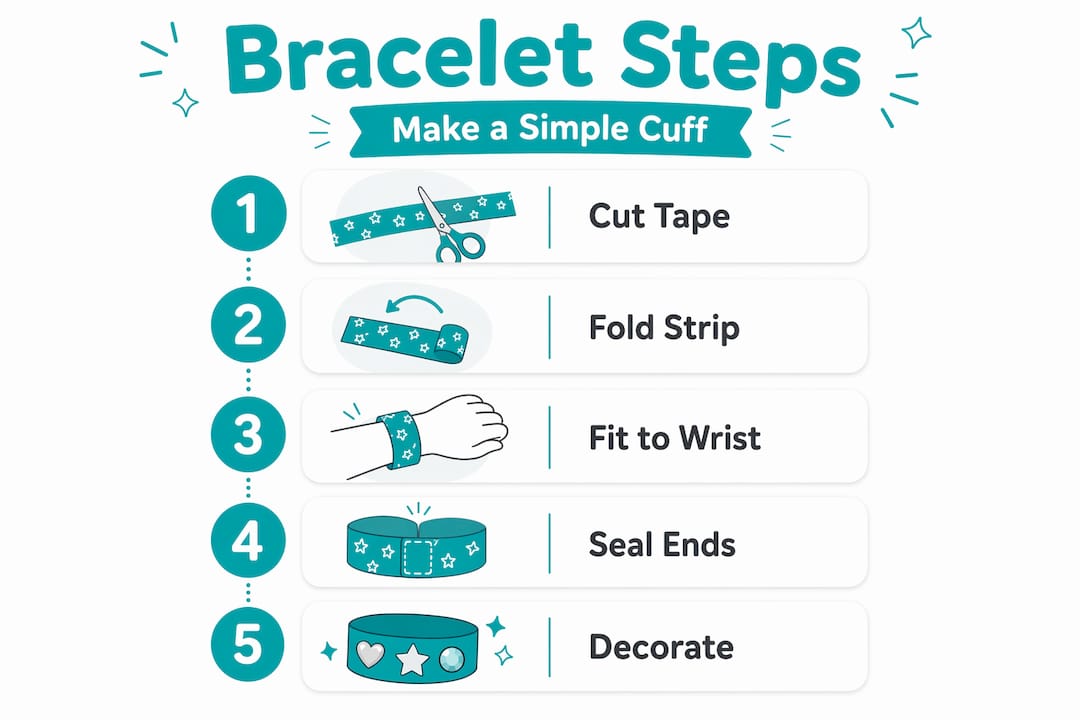
How to make a simple cuff-style bracelet
The cuff bracelet is the best starting point for anyone new to this craft. It requires just one strip of tape, no braiding, and produces a clean, wearable result in under ten minutes. Here is how to do it:
- Measure your wrist and cut your strip. A 10-inch strip works for most kids, but measure the child’s wrist and add about two inches to find the right length. Cut the strip cleanly using scissors or a craft knife on your cutting mat.
- Fold the strip lengthwise. Lay the strip sticky-side up on your work surface. Fold one long edge toward the center, then fold the other long edge over it so the sticky sides meet completely. Press firmly along the entire length to seal the fold.
- Repeat the fold for added thickness. For a sturdier bracelet, fold the strip in half lengthwise one more time. This creates a narrow, durable band that holds its shape well during wear.
- Add a decorative overlay. Cut a thinner strip of a contrasting color or patterned tape and press it along the center of the folded band. This is where the creative duct tape designs really start to shine. Chevron patterns, polka dots, and animal prints all look great as overlays.
- Finish the ends. Wrap a small piece of tape around each end of the bracelet to create clean, sealed edges. Then connect the ends by overlapping them slightly and pressing together, or use a Velcro dot for an adjustable closure.
Pro Tip: If the bracelet feels too stiff right after making it, flex it gently back and forth a few times. The tape softens with handling and conforms to the wrist much more comfortably.
The cuff style is also a great canvas for layering. You can press small sticker gems, washi tape accents, or even tiny foam stickers onto the surface before sealing the edges. Kids love personalizing their bracelets this way, and it turns a simple project into a genuine expression of their personality.
Making a braided duct tape bracelet
The braided bracelet takes a little more patience than the cuff, but the result is a textured, colorful piece that looks genuinely impressive. The key is preparation. Once your strips are folded and your workspace is set up, the braiding itself moves quickly.
Follow these steps:
- Cut three strips, each 17 inches long, in three different colors. Three 17-inch strips is the standard length for a bracelet that fits most kids and adults comfortably.
- Fold each strip lengthwise. Fold each strip the same way you would for the cuff: sticky sides in, pressed firmly together. You should end up with three long, flat tape cords.
- Anchor the strips at the top. Use a binder clip or clipboard to hold the three strips together at one end. This keeps everything from sliding around while you braid and makes the process much easier, especially for younger crafters.
- Braid tightly and evenly. Cross the right strip over the center, then the left strip over the new center. Keep tension consistent throughout. Loose braiding creates gaps that look uneven and weaken the bracelet.
- Stop braiding when you have about one inch of strip remaining on each cord. Clip or hold the end to keep it from unraveling.
- Secure both ends. Wrap a small piece of tape tightly around each end of the braid to hold the strips together. Trim any excess length, then connect the ends with a loop-and-keeper closure made from a small folded piece of tape, or use Velcro for easy on and off.
Here are a few extra tips that make the braided style turn out better:
- Use three distinctly different colors so the braid pattern reads clearly. Colors that are too similar visually blend together and lose the effect.
- Keep your folded strips as narrow and even as possible. Uneven folding creates a lumpy braid.
- Making and unmaking the braid two or three times before your final version actually softens the tape and makes it more pliable, which improves the final look significantly.
Pro Tip: If the braid keeps slipping while you work, tape the anchored end directly to your cutting mat with a small piece of scrap tape. It frees up both hands and makes even braiding much easier.
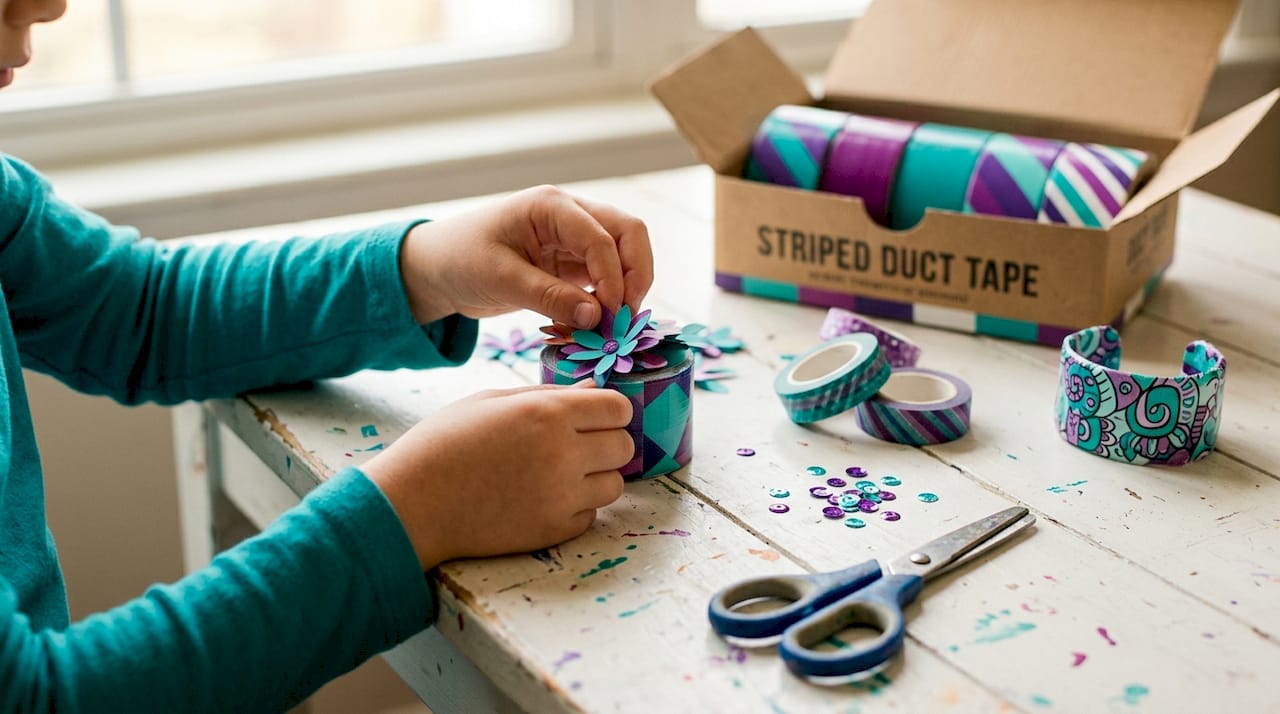
Creative customization and common troubleshooting
Once kids get comfortable with the basic cuff and braid, the real fun begins. Duct tape jewelry ideas are practically limitless, and most of the best customizations require nothing more than tape in different colors and a little imagination.
Decoration ideas worth trying
- Layer thin strips of metallic or neon tape diagonally across a cuff for a striped effect.
- Press small adhesive gems or rhinestones onto the surface of a finished cuff before sealing the edges.
- Cut tiny shapes (stars, hearts, arrows) from contrasting tape and apply them as accents.
- Braid with one metallic strip and two solid colors for a bracelet that catches light beautifully.
- Stack two thin cuff bracelets side by side on the wrist for a layered look.
Closures and fit
DIY duct tape clasps are a practical and stylish alternative to store-bought hardware. A simple loop-and-keeper made from folded tape strips works well and stays secure through normal wear. Velcro dots are another great option, especially for younger kids who need to put the bracelet on and take it off independently.
Fixing common problems
The most frequent issue crafters run into is sticky edges where the tape did not fold completely over itself. The fix is simple: press a thin strip of matching tape along the sticky edge to cover it cleanly. Butting tape edges closely rather than overlapping them also creates a much smoother finish on the outside of the bracelet.
Loose braids are usually caused by inconsistent tension. If the braid looks uneven after finishing, unwrap the ends, redo the braid with firmer tension, and re-secure. The tape can handle being worked and reworked. Patience in braiding and folding is genuinely rewarded with a more elegant result.
Pro Tip: If your tape strips are too wide for the bracelet style you want, you can narrow them by making a small slit at one edge and ripping the tape lengthwise. It gives a cleaner edge than scissors for this particular adjustment.
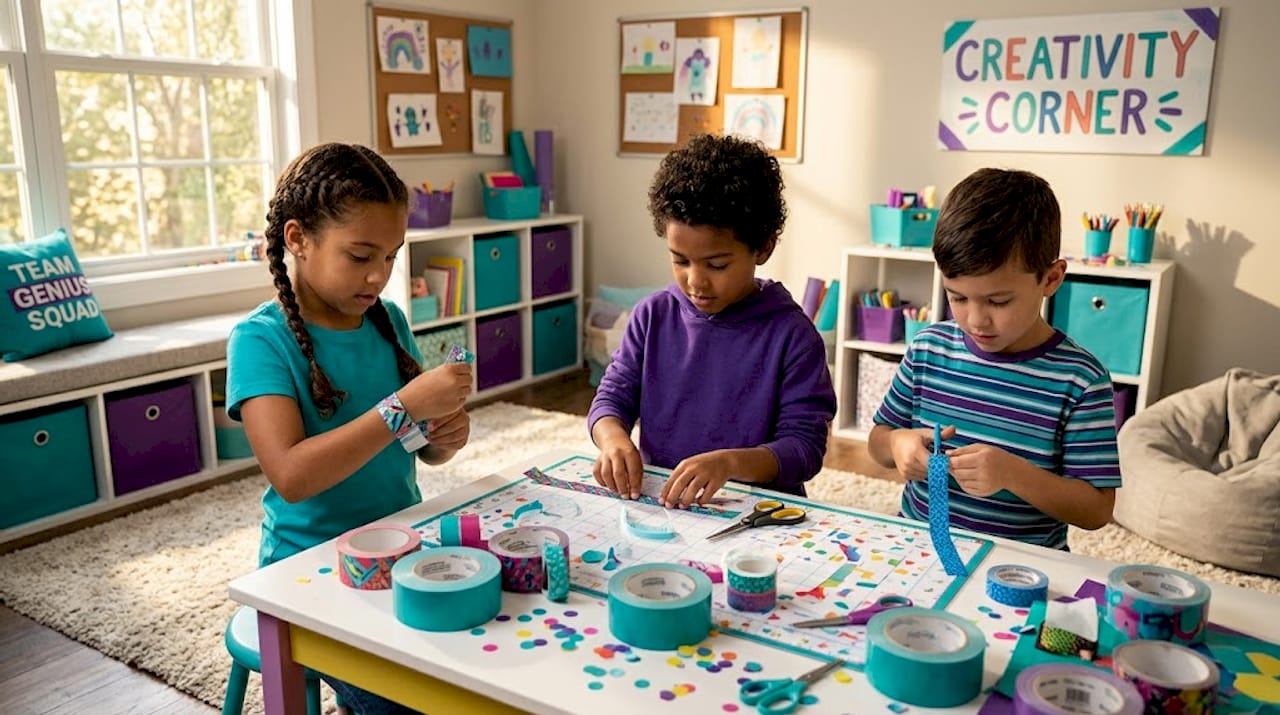
Group projects and benefits for kids
Duct tape bracelets scale beautifully for group settings, which makes them ideal for classrooms, birthday parties, scout troops, and community events. The materials are inexpensive, the process is fast, and every child ends up with something tangible and wearable to take home.
The developmental benefits are real and worth paying attention to. Cutting, folding, and braiding all build fine motor skills that support handwriting, drawing, and other precision tasks. Choosing colors and designing patterns exercises creative decision-making. And completing a bracelet from start to finish gives kids a genuine sense of accomplishment that builds confidence over time.
Group bracelet projects also teach collaboration. When kids work side by side, they naturally share tips, help each other troubleshoot, and celebrate each other’s results. These are the same social skills that show up later in team-based learning environments. Crafting together with fine motor skill development at the center is one of the most organic ways to build those abilities in children.
The scalability of bracelet crafting for charitable or community purposes is also worth noting. Group crafting projects can produce meaningful quantities of handmade items. The dedication involved in producing large numbers of handmade items teaches kids about sustained effort and giving back, values that extend well beyond the craft table.
My take on duct tape bracelets as a family craft
I have seen a lot of crafts come and go in the world of hands-on kids’ activities, and duct tape bracelets have genuinely earned their staying power. What I love most about them is that the barrier to entry is almost zero. You do not need a craft room, expensive supplies, or any prior experience. You need tape, scissors, and about fifteen minutes.
What I have learned from watching kids make these bracelets is that the frustration usually comes early and the pride comes fast. The first fold is awkward. The first braid might be uneven. But by the second or third attempt, something clicks, and the child is suddenly problem-solving on their own, adjusting tension, choosing better color combinations, and teaching the technique to someone else.
That shift from struggling to teaching is exactly what hands-on crafting is supposed to do. It builds the kind of confidence that does not come from being told you did a good job. It comes from making something real with your own hands. I always encourage families to sit down and make bracelets together, not just supervise. When a parent struggles with the braid alongside their child, it models something important: that learning takes practice, and that is perfectly fine.
The connection to broader hands-on learning is natural here. Crafting like this pairs beautifully with STEAM activities that ask kids to measure, plan, and iterate. The same mindset that makes a child a better bracelet maker makes them a better young scientist.
— Tita
Take the creativity even further with Teamgeniussquad
If your child has caught the crafting bug through duct tape bracelets, that creative energy deserves more room to grow. Teamgeniussquad designs hands-on, screen-free STEAM discovery kits built specifically to channel that same curiosity into real learning experiences for kids ages 5 to 13.

The STEM-STEAM Electricity Lab Bundle is a natural next step for kids who love making things with their hands. It brings the same satisfaction of building something real, but layers in science concepts that spark genuine wonder. For kids who love wearable creations, the kids’ bracelet collections at Teamgeniussquad offer colorful, STEM-themed accessories that pair perfectly with homemade duct tape designs. And if your child is drawn to jewelry-style projects, the jewelry and accessories collection gives them even more ways to express their creativity through purposeful, educational play.
FAQ
What do you need to make duct tape bracelets?
You need duct tape in your chosen colors, scissors, a ruler, and a flat work surface like a cutting mat or cardboard. Optional supplies include a binder clip for braiding and Velcro dots for closures.
How long should duct tape strips be for a bracelet?
A simple cuff bracelet uses a single strip about 10 inches long, while a braided bracelet requires three strips each cut to approximately 17 inches.
Are duct tape bracelets waterproof?
Yes. Duct tape bracelets are naturally waterproof and durable, making them safe to wear during water activities like swimming or beach trips without falling apart.
How do you keep a duct tape bracelet from feeling sticky?
Fold each strip completely so the sticky sides meet in the middle, then press firmly along the full length. Any remaining sticky edges can be covered with a thin strip of matching tape.
Can young kids make duct tape bracelets on their own?
Children as young as five or six can participate with adult help for cutting. The folding and decorating steps are manageable for most kids independently, and the process requires no knotting or complex techniques.


Leave a comment
This site is protected by hCaptcha and the hCaptcha Privacy Policy and Terms of Service apply.